
Integrating Mailchimp Subscription Form with Astro

Key Takeaways
- Mailchimp’s embedded form posts to a JSONP endpoint, so you can submit it from Astro without a backend and without CORS headers.
- You only need two values from Mailchimp: the
u(user) andid(list) parameters hidden in the embed code’sactionURL.- The handler serializes the form, builds a
post-jsonURL with a named callback, and injects a<script>tag to receive the response.
Introduction
A subscription form that talks directly to Mailchimp is one of the fastest ways to grow an audience from an Astro site. This tutorial walks through a JavaScript snippet that submits a Mailchimp form using JSONP, the technique that lets the browser call Mailchimp’s endpoint cross-origin without a server of your own and without CORS configuration.
JSONP fits this job well because Mailchimp’s embedded forms already expose a JSONP endpoint. Mailchimp handles email campaigns and subscriber management on its side, and a self-hosted form gives you full control over styling while still writing subscribers straight into your audience. The rest of the post covers the Mailchimp setup, the HTML form, and the JSONP submit handler.
If you send form data into other services too, the same serialize-and-submit pattern shows up in my Google Sheet form integration.
How do you set up a form in Mailchimp?
Setting up the form in Mailchimp means creating an audience, opening the embedded-form builder, and copying two values out of the generated embed code: the u and id parameters.
-
Log in to Your Mailchimp Account Log in to your Mailchimp account. If you don’t have one, you can sign up for free on the Mailchimp website.
-
Navigate to the Audience Dashboard Once logged in, go to the Audience dashboard. If you haven’t created an audience yet, set one up to start collecting subscribers.
-
Create or Select an Audience If you don’t have an audience, follow the prompts to create a new one. If you have an existing audience, click it to open the Audience settings.
-
Access the Signup Forms Within your selected audience, open the “Audience dashboard,” then go to “Manage Audience” and choose “Signup forms.”
-
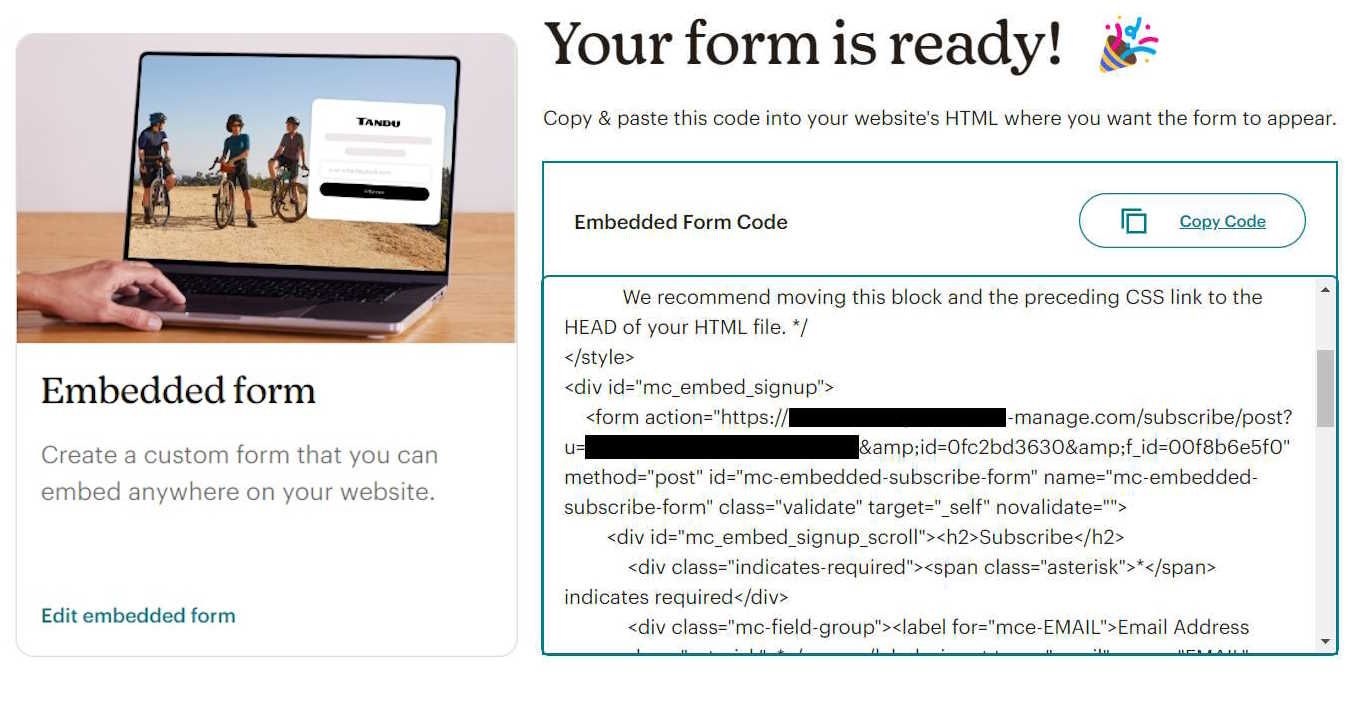
Choose Embedded Forms In the Signup Forms section you’ll find several options. Select “Embedded forms.”
-
Customize Your Embedded Form (Optional) Mailchimp lets you pick the form type, fields, and options to match your site. For this tutorial I skip the default markup and take only the endpoint from the form, so I can build my own.
-
Generate the Embed Code Under the “Copy/paste onto your site” section, copy the HTML. From the form’s
actionURL, note the full URL and the value afteru=.
How do you add the form to your Astro page?
Drop a standard HTML form onto the page using Mailchimp’s field names, then style it however you like. The form id, the input name values, and the hidden honeypot field must match what Mailchimp’s endpoint expects; everything else is yours to restyle.
<form
  id="mc-embedded-subscribe-form"
  name="mc-embedded-subscribe-form"
  class="validate"
>
  <div id="mc_embed_signup_scroll">
    <h2>Subscribe</h2>
    <div class="indicates-required">
      <span class="asterisk">*</span> indicates required
    </div>
    <div class="mc-field-group">
      <label for="mce-EMAIL"
        >Email Address <span class="asterisk">*</span></label
      >
      <input
        type="email"
        name="EMAIL"
        class="required email"
        id="mce-EMAIL"
        required=""
        value=""
      />
      <span id="mce-EMAIL-HELPERTEXT" class="helper_text"></span>
    </div>
    <div id="mce-responses" class="clear foot">
      <div
        class="response"
        id="mce-error-response"
        style="display: none;"
      ></div>
      <div
        class="response"
        id="mce-success-response"
        style="display: none;"
      ></div>
    </div>
    <div aria-hidden="true" style="position: absolute; left: -5000px;">
      <input
        type="text"
        name="b_faf118b7ec5be23b94e4c9fc0_0fc2bd3630"
        tabindex="-1"
        value=""
      />
    </div>
    <div class="optionalParent">
      <div class="clear foot">
        <input
          type="submit"
          id="mc-embedded-subscribe"
          class="button"
          value="Subscribe"
        />
        <p style="margin: 0px auto;">
          <a
            href="http://eepurl.com/iBlWMM"
            title="Mailchimp - email marketing made easy and fun"
          >
            <span
              style="display: inline-block; background-color: transparent; border-radius: 4px;"
            >
              <img
                class="refferal_badge"
                src="https://digitalasset.intuit.com/render/content/dam/intuit/mc-fe/en_us/images/intuit-mc-rewards-text-dark.svg"
                alt="Intuit Mailchimp"
                style="width: 220px; height: 40px; display: flex; padding: 2px 0px; justify-content: center; align-items: center;"
              />
            </span>
          </a>
        </p>
      </div>
    </div>
  </div>
</form>How do you submit the form to Mailchimp with JSONP?
The submit handler intercepts the form, serializes its fields, and sends them to Mailchimp’s post-json endpoint through a dynamically injected <script> tag. JSONP is what lets the response come back without CORS.
<script type="text/javascript">
document.addEventListener("DOMContentLoaded", function () {
    const form = document.getElementById("mc-embedded-subscribe-form");

    form.addEventListener("submit", function (e) {
        e.preventDefault(); // Prevent the default form submission

        // Serialize form data to a query string
        const formData = new FormData(form);
        const serializedData = new URLSearchParams(formData).toString();

        // Define the JSONP callback function name
        const callbackName = "handleMailchimpResponse";

        // Define the JSONP URL with callback parameter
        const jsonpUrl =
            "https://barefootrecipe.us10.list-manage.com/subscribe/post-json?u=faf118b7ec5be23b94e4c9fc0&id=0fc2bd3630&" +
            serializedData +
            "&c=" +
            callbackName;

        // Create a script element for JSONP
        const script = document.createElement("script");
        script.src = jsonpUrl;

        // Define the JSONP callback function
        window[callbackName] = function (response) {
            // Handle the JSONP response as needed
            if (response.result === "success") {
                console.log("Form submitted successfully.");
                // You can redirect or display a success message here
            } else {
                console.error("Form submission failed.");
                // Handle errors here
            }

            // Clean up by removing the script element and callback function
            document.body.removeChild(script);
            delete window[callbackName];
        };

        // Append the script element to the document to initiate the JSONP request
        document.body.appendChild(script);
    });
});
</script>The callback checks response.result. On success it logs a confirmation; otherwise it logs an error. Then it removes the injected <script> and deletes the global callback to clean up. Mailchimp also returns a msg string with human-readable detail, such as a duplicate-email notice, which you can show to users (see the FAQ below).
Frequently asked questions
Mailchimp's embedded-form endpoint returns JSON wrapped in a JavaScript function call, which is exactly what JSONP expects. A plain fetch would hit the same-origin and CORS boundary; JSONP sidesteps it by loading the response as a script. That keeps the whole form client-side, with no backend route to deploy.
Open Mailchimp's embedded-form code and look at the form tag's action attribute. The URL contains u (your account or user ID) and id (the audience or list ID). Copy both into the post-json URL in the submit handler, swapping the host and IDs for your own list.
Yes. The subscribe/post-json endpoint is the JSONP target behind Mailchimp's classic embedded forms, and it still accepts cross-origin submissions. It returns a result of either success or error, plus a msg string you can display to users.
Inside the callback, branch on response.result. On success, reveal a confirmation message and reset the form; on error, display response.msg (for example, 'This email is already subscribed'). The code block above logs to the console as a starting point, so wire those branches to elements in your UI.
Yes, with one change. Run the handler setup on the astro:page-load event instead of DOMContentLoaded, because view transitions swap content without a full page reload and DOMContentLoaded only fires once.
Conclusion
With Mailchimp’s u and id in hand and the JSONP handler wired to your form, you have a fully client-side subscription flow for your Astro site, with no server and no CORS headaches. Add your own success and error messaging, match the field names to your audience, and the form writes subscribers straight into Mailchimp. If you’re also sharpening the SEO or performance of that page, my guides on JSON-LD structured data for Astro and Core Web Vitals in Astro pick up where this leaves off.
Related articles

Integrating Google Analytics with Astro, Typescript and View Transitions
Learn how to set up Google Analytics with Astro JS to track user interactions effectively.

Building a Documentation Site with Astro Starlight and Custom Expressive Code
Learn how to create a stunning documentation site using Astro Starlight and add custom expressive code blocks to enhance developer experience.

Hiding an API key with a serverless function
Learn how to Securely Handling API Keys with Vercel Serverless Function